 button to open the Project Settings dialog. The Fill Properties page controls the default fill properties.
The Fill Properties section in the Property Manager controls the fill properties for the selected object in the project. Fill properties are used in polygons, rectangles, and circles.
Click the Tools | Project Settings command or click the button to open the Project Settings dialog. The Fill Properties page controls the default fill properties.

Set the Fill Properties for the selected
object in the Property Manager.
The Pattern indicates the way that an object is filled. To change the Pattern, click on the existing pattern sample next to Pattern. In the list, select a new pattern from the fill pattern palette. There are two types of fill patterns: Windows stock and bitmap images. Stock patterns and some bitmap patterns can have different foreground and background colors. All patterns can have the foreground or background color partially transparent. Bitmap patterns can be scaled.
To load a fill pattern from a raster image file, click the Custom button at the bottom of the fill pattern palette. An Import dialog will appear. Click on the image file and click Open to load the image as the fill pattern.
The Foreground is the color of the pattern lines or pixels. Click the existing color sample next to Foreground to open the color palette. Click on a color in the palette to use it for the selected foreground fill color. Click the Custom button at the bottom of the palette to open the Colors dialog and create custom colors.
The Foreground Opacity controls the transparency of the foreground portion of the pattern. To change the Foreground Opacity, highlight the existing value and type a new value. Press ENTER on the keyboard to make the change. Alternatively, click on the to increase or decrease the opacity value. Opacity values are between 0% (zero opacity, full transparency) to 100% (full opacity, zero transparency).
The Background is the color behind the pattern. Click the existing color sample next to Background to open the color palette. Click on a color in the palette to use it for the selected background fill color. Click the Custom button at the bottom of the palette to open the Colors dialog and create custom colors.
The Background Opacity controls the transparency of the background portion of the pattern. To change the Background Opacity, highlight the existing value and type a new value. Press ENTER on the keyboard to make the change. Alternatively, click on the to increase or decrease the opacity value. Opacity values are between 0% (zero opacity, full transparency) to 100% (full opacity, zero transparency).
To make a fill pattern appear transparent with only the foreground portion of the fill pattern showing, change the Background Opacity value to 0%.
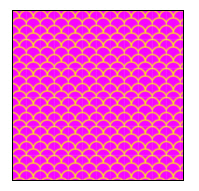
The Scale controls the density of the bitmap fill Pattern. The scale factor controls the density of the pattern. Set the Cover mode to Tile and set the Scale factor to a value between 0.1 and 10. The larger the Scale, the larger the resulting pattern.
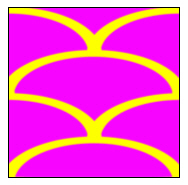
The Cover mode is used with bitmap patterns. The Cover mode determines how the bitmap is used to fill the desired area. You can Stretch a bitmap to fit the fill area or Tile the pattern in the fill area. To change the behavior, click on the existing value and select the desired option from the list.
 |
 |
|
This bitmap fill has the Cover mode set to Stretch. |
This bitmap fill has the Cover mode set to Tile. |
See Also