The File | Export options allow you to save project information in files that can be used by other programs. For example, you might want to use the digitized points from the tutorial example to produce a contour map in Golden Software’s Surfer. Each of the monitoring wells digitized in Lesson 3 - Drawing the Monitoring Wells had a groundwater elevation value entered as the secondary ID. With Export, you can create a data file of this groundwater elevation information.
If you have not done so already, it is recommend that you complete lesson 2 and lesson 3 to calibrate a project and draw symbols in the project.
For this lesson, let’s produce a text file of points. First, we need to select just the points in the file. This is easily accomplished with Criteria Select.
To select points only:
Click the Edit | Criteria Select command.
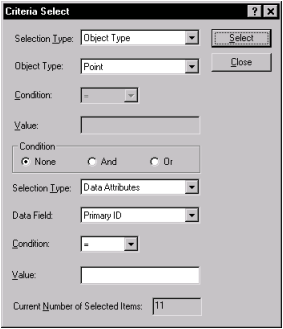
In the Criteria Select dialog, click on the existing option next to Selection Type and select Object Type from the list.
Click on the existing option next to Object Type and select Point from the list. Note that the Object Type list does not exist until Object Type is selected from the Selection Type list in step 2.
Click the Select button. This selects the all of the symbols that have been digitized.
Click Close to close the dialog. The symbols are still selected.
The Selection Type should be Object Type and the Object
Type should be Point to select all the points in the file.
To export the points:
Click the File | Export command or click the  button.
In the Export dialog,
Check the box next to the Selected objects only option.
Select the DAT Golden Software Data (*.dat) format from the Save as type field.
Type a name into the File name field, such as Example Export.
Click the Save button.
The Data Export Options dialog appears allowing you to specify the format of the .DAT file.
In the Delimiter section, select Tab.
In the Text Qualifer section, select " (Double quote).
Click OK and the Golden Software Data .DAT file is created. This data file can be used in software that accepts ASCII text files.
Back to Saving a Didger Project
Next to Lesson 9 - Digitizing Objects with Shared Borders
Note: if you are using the demo version of Didger, the files cannot be saved or exported. Proceed to Lesson 9 - Digitizing Objects with Shared Borders instead.