Export
Click the File | Export command, click the  button, or press CTRL+E on the keyboard to export the project information in files that can be used by other programs. The File | Export command is not available if no objects exist in the current project. The only way to preserve all information about a project within Didger is to save as a Didger project .PJT file by clicking the File | Save or File | Save As commands.
Export Dialog
After clicking the File | Export command, the Export dialog opens.
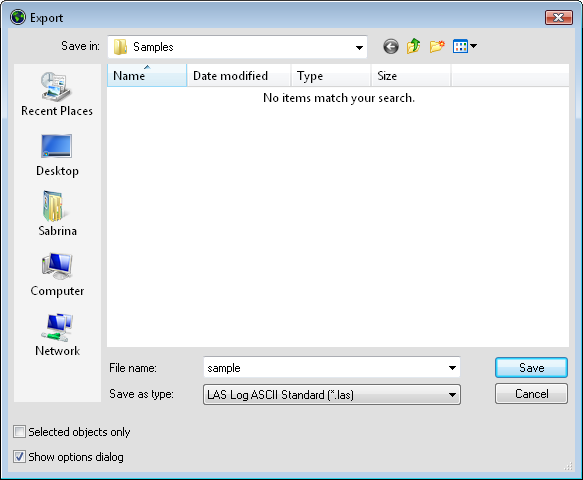
Type a File name and set the Save as type to the desired file format to export the project.
Save In
The Save in field shows the current directory. Click the down arrow to see the directory structure and click on the folders to change directories. The buttons to the right of the Save in field allow you to create new folders and change the view of the file list.
File List
The file list displays the files using the extension specified in the Save as type box. A file can be overwritten by selecting it from the file list.
File Name
The File name box displays the name of the selected file, or type in the path and file name of the file to be exported.
Save As Type
The Save as type list box specifies the format of the file to be exported.
Selected Objects Only
Check the Selected objects only box to export selected objects rather than the entire plot.
Show Options Dialog
Check the Show options dialog option to display the Export Options dialog for the selected Save as type. If the Show options dialog option is checked, when the Save button is clicked the appropriate Export Options dialog (if any) appears. The Size and Color page, Spatial References page, and any file specific pages are displayed. Refer to the Files | Import Options section of the help for additional information on specific import options.
File Name
Export files typing a name into the File name box and then selecting the file type in the Save as type list. For example, typing MYPLOT in the File name box and choosing Tagged Image (*.tif, *.tiff) from the Save as type list results in MYPLOT.TIF. There is no need to type in an extension because it is automatically added. If a file extension is typed in the box along with the file name, the file type is determined by the typed extension. For example, if MYPLOT.DXF is typed in the File name box, the resulting file is in the AutoCAD DXF format, no matter what is set in the Save as type field.
Export Units
For projected projects, the exported units are always determined by the units listed in the Coordinate Manager. To export in different units, click Cancel in the Export dialog. Click on the Coordinate Manager and change the Display Units.
See Also
File Format Chart
GSR Files
Selecting Objects
Save