It is usually very difficult to create polygons that share common borders and get the borders to match exactly. The Draw | Edit Boundaries | Create Polygons by IDs command lets you create polygons that share common borders by digitizing the shared border (polyline) one time, and using the single border to create both adjacent polygons.
For each polyline used by the Create Polygons by IDs you must first create an ID in the field that is assigned to the Polygon Left and Polygon Right attributes defined by clicking the Map | Data | Edit Attribute Fields command.
The polyline nodes must be coincident with the nodes of the other polylines used to create the polygons in this command. For this reason, it is recommended that you use the Draw | Edit Boundaries | Snap All Polyline Segments command before using Draw | Edit Boundaries | Create Polygons by IDs command.
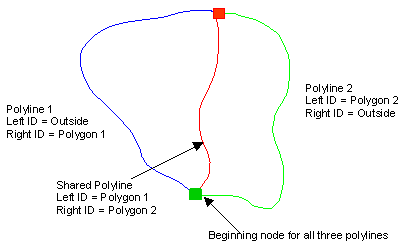
Consider the example below where three polylines are digitized to create two adjoining polygons. The beginning node for all three polylines is at the bottom center and is indicated by the green box. The Left and Right IDs for the three polylines are also indicated.
Three polylines are digitized with the left and right IDs as shown above.
To use the Create Polygons by IDs command
Draw the three polylines as shown above by clicking the Draw | Polyline command. Start at the top of the polyline.
Snap the polyline segments to one another by clicking the Draw | Edit Boundaries | Snap All Polyline Segments command. If the polyline segments are not snapping together, check the snap tolerance value and display the snap tolerance circles. You may need to reset the snap tolerance value or reshape the polyline.
Click the Map | Data | Edit Attribute Fields command to open the Data Attributes dialog.
Set the Polygon Left to the Tertiary ID and the Polygon Right to the Quaternary ID.
Click OK.
Click on the blue polyline above to select it.
In the Property Manager, in the Data Attributes section, set the Primary to Polyline 1.
Set the Tertiary to Outside.
Set the Quaternary to Polygon 1.
Click on the red polyline to select it.
In the Property Manager, in the Data Attributes section, set the Primary to Shared Polyline.
Set the Tertiary to Polygon 1.
Set the Quaternary to Polygon 2.
Click on the green polyline to select it.
In the Property Manager, in the Data Attributes section, set the Primary to Polyline 2.
Set the Tertiary to Polygon 2.
Set the Quaternary to Outside.
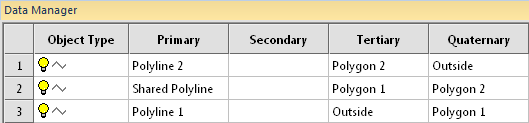
The Data Manager displays all of the objects and IDs.
Click the Draw | Edit Boundaries | Create Polygons by IDs command.
In the Create Polygon by ID's dialog,
Select the polygon you want to produce from the Select Left/Right ID list.
The name is automatically entered for the Primary for the new polygon to be created in the New Object ID's list.
If desired, type a Secondary, Third, and Fourth ID.
Click Create and the new polygon is created.
Repeat steps 10 and 11 for the second polygon.
Click Close to exit the dialog. The new polygons are displayed.
The next figure shows two polygons after they have been created with the Create Polygons by IDs command.
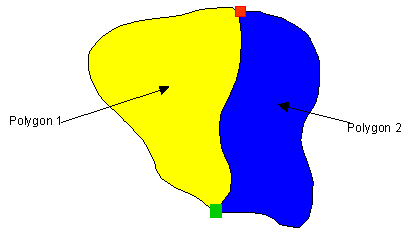
Two polygons are created after using the Draw | Edit
Boundaries | Create Polygons by IDs command.
Note: You can only create one polygon at a time, even if you create polylines defining multiple polygons with the same IDs.
See Also
Polyline to Polygon with Shared Border