Import Data File Dialog
Click the File | Import command, click the  button, or press CTRL+I on the keyboard to import a file into a Didger project. This command opens the Import dialog so you can select the file to open in Didger. After a data file is selected and the Open button is clicked, the Import Data File dialog appears.
To import a data file into Didger, the data file must have at least two columns containing X and Y locations. Additionally, you can have other columns of information that can be used as data attributes. Data can be imported as a post map, which creates a single object. Or each data point can be imported separately, creating a new object for each point in the data file.
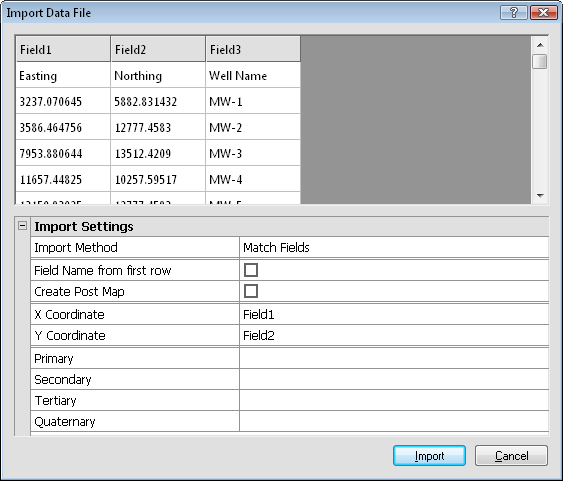
Set the data columns for the coordinates and attributes in the Import Data File dialog.
Data Columns
The data columns are shown in a spreadsheet format at the top of the dialog. Only the first 50 rows of the data file will be displayed in the spreadsheet format.
Import Method
The Import Method controls how fields are assigned from the data file to existing data attribute fields in the project. Available options are Match Fields, Append Fields, and Replace Fields. To change the Import Method, click on the existing option and select the desired option from the list.
When the Import Method is set to Match Fields, the available attributes from the project are listed in the dialog below the Y Coordinate option. To match a field from the data file, click in the empty box next to one of the attribute names. Select the desired data file field name from the list.
When the Import Method is set to Append Fields, all fields in the data file (other than the X Coordinate and Y Coordinate fields) are automatically added as new attributes in the project. After importing the data, the project has the previous attribute fields in addition to the newly defined attributes from the data file. The project attribute fields are grayed out in the Import Data File dialog.
When the Import Method is set to Replace Fields, all fields in the data file (other than the specified X Coordinate and Y Coordinate fields) replace the previously existing data attribute fields. After importing the data, the project only has the newly defined attributes from the data file. The project attribute fields are grayed out in the Import Data File dialog.
Field Name from First Row
Check the box next to the Field Name from first row option to set the imported data field names to be the same as the first row in the data file. When unchecked, the fields are named Field1, Field2, Field3, etc.
Create Post Map
Check the box next to the Create Post Map option to import all data points from the file into Didger as a single post map object. When unchecked, each row in the data file is import as an individual point object. When Create Post Map is checked, the Primary ID is preserved for each individual point in thepost map object. However the Primary ID cannot be individually edited from within the project.
Importing the data as a single post map is useful when importing large data files because only a single object is created. One common use for this option would be you want to import a data file and convert from one coordinate system to another. The data associated with each point does not need to be edited, so importing the data with the Create Post Map option speeds the conversion and export.
Imported grid files are always imported as a post map.
Coordinate and Attribute Fields
The X Coordinate and Y Coordinate are required when importing a data file.
Other attribute fields are defined by the Primary, Secondary, Tertiary, and Quaternary options, when the Import Method is set to Match Fields. Other field definitions are optional.
To change any coordinate or attribute field to another column in the data file, click on the existing option or the empty box next to the coordinate or attribute name. Select the desired column from the list.
Import or Cancel
Click Import to initiate the import of the data file. Click Cancel to close the dialog without importing.
See Also
New
Import
File Format Chart