Lesson 4 - Converting Coordinates - Tutorial
A coordinate conversion adjusts the values of the existing coordinate system and maps the values to new locations. Examples of situations you would use coordinate conversions include: converting the file coordinates of an imported file or converting a site-specific coordinate system to a regional coordinate system.
Didger can perform two types of coordinate conversions: Math Operation and Georeference. Both methods convert coordinates but require different information about the data. Either method can be selectd for converting coordinates. The Math Operation option is used when a known offset in the project coordinate system exists. For example, adding, subtracting, multiplying, or dividing every X value by 2. The Georeference option is used when the exact coordinates of three or more non-linear points are known and the map will be recalibrated based on those values. This is useful when you a Didger project file contains either vector data only or both a georeferenced image and vector data and needs recalibrating. You can select from a list of many transformation functions when converting the coordinates.
This example will continue with the map from lesson 3 and convert the coordinates using a math operation. If the map does not exist yet, work through Lesson 2 to import the map.
Once the map is open, confirm the coordinates of the map.
-
Zoom into the CP1 point, located in the lower left corner of the map using the View | Zoom | In command.
-
Press ESC on the keyboard to end zooming mode.
-
Click the Draw | Symbol command.
-
In the Property Manager, uncheck the box next to the Enter Data After Creation option.
-
Click on the CP1 location on the image.
-
Press ESC on the keyboard to end drawing mode.
-
Click on the new symbol to select it.
-
In the Coordinate Manager, the point is recorded with values near X = 1200, and Y = 4000.
-
Click on other points in the map and confirm the values.
Based on new information, it is determined that the X value for this bottom point should actually be X = 2200. The value that was calibrated is off by 1000 meters. This is something that is corrected easily in Didger. To adjust the X values by 1000 meters:
-
Click the Map | Coordinate Conversion command or click the  button.
-
In the Coordinate Conversion dialog, change the Input Data Units to Meters by clicking on the empty box and select Meters from the list.
-
Select Math Operation as the type of coordinate conversion.
-
In the X Axis Operation section, select + (Add).
-
Highlight the 0.00 and type 1000.
-
In the Y Axis Operation section, select + (Add).
-
Enter 0 into the value box since we are not adjusting the Y values.
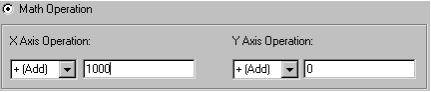
Add 1000 to the X coordinates and 0 to the Y
coordinates in the Coordinate Conversion dialog.
-
Click OK to adjust the coordinates.
If you click on the point in the lower left corner of the map, you will see that the coordinates are now closer to 2200, 4000. All of the X values have been adjusted by 1000 meters.
Back to Editing Polylines
Next to Lesson 5 - Assigning and Changing the Projection