Change Output Limits Dialog
Use the Change Output Limits dialog when you do not want to use the Automatic Image Extents in the Image Registration and Warping dialog. This dialog lets you specify a particular extent from the original image.
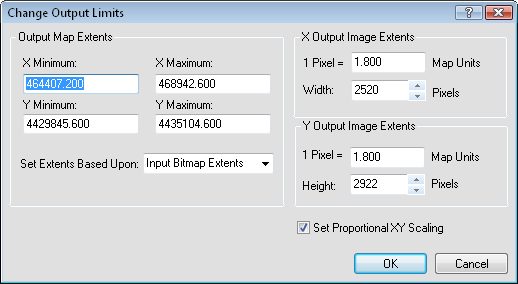
Set the limits and image extents in the Change Output Limits dialog.
The Output Map Extents section describe the limits, in world coordinates, of the new warped image. You can set the extents manually by entering the extents into the X Minimum, X Maximum, Y Minimum, and Y Maximum boxes. Alternatively, you can set the extents by choosing Input Image Extents or Calibration Coordinates from the Set Extents Based Upon drop-down list.
Input Bitmap Extents calculates the extents based on the edges of the original image.
Calibration Coordinates defines the extents based on the calculated extents of the calibration points.
The X Output Image Extents and Y Output Image Extents sections specify the scaling along the specified axes. You can use these settings to create a smaller test image before making a larger image. For example, if your DRG is 5000 X 5000 pixels, you can make a 300 X 300 pixel image to check the warping before making the final image. Use Edit | Undo to return to the original state if you have made a test image, and then rewarp the image using the final image extents.
The 1 Pixel = __ Map Units edit box specifies the number of units pixel in the specified dimension. For example, if your calibrated image contains meters as the units, and you want your project to be drawn at a scale of 100 meters per pixel, type the value 100 into the edit box. The Width or Height value is automatically updated to reflect the change you make.
The Width and Height edit boxes specify the length of the project in the specified dimension. When you change the Width or Height value, the 1 Pixel = __ Map Units edit box is automatically updated to reflect the change.
The Set Proportional XY Scaling check box forces the X and Y dimensions to be scaled equally. When the check box is activated and you make a change to the X or Y dimension, the other dimension is scaled the same amount. The same number of units per pixel is applied to both the X and Y dimensions. If you want to scale the dimensions differently, you must uncheck the check box.
Once you have clicked the OK button in the Change Output Limits dialog, the calculations take place. Depending on the selected Warp Method, this may take awhile. You may be asked about Undo due to the size of the image. If you are sure that the warp settings are correct, click Yes to continue without undo.
See Also
Image Registration and Warping