The Load Calibration Points dialog allows you to use previous calibration points.
Load Calibration Points Dialog
The Load Calibration Points dialog is accessed through the Image Registration and Warping dialog or the Create Calibration Points dialog by clicking the Load button.
The Load Calibration Points dialog allows you to use previous calibration points.
To load points:
Click the Load button in the Image Registration and Warping dialog, the Create Calibration Points dialog, or the Coordinate Conversion dialog to load existing calibration points into the project.
Points may be loaded from any data file format, such as a .DAT, .XLSX, or .ACCDB file. Select the appropriate file in the Open dialog.
Click Open.
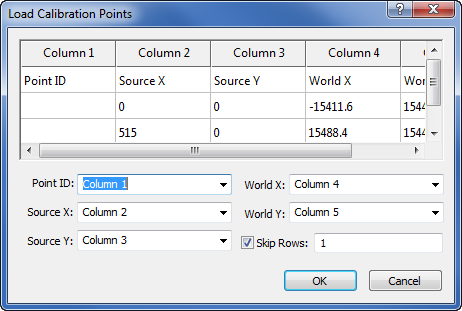
The Load Calibration Points dialog appears.
Set the columns to the appropriate columns in the worksheet.
Click OK. The values are loaded into Image Registration and Warping dialog, the Create Calibration Points dialog, or the Coordinate Conversion dialog in the calibration points table.
The Point ID option contains the column assigned to the Point ID. To change the column, click on the existing option and select the appropriate column from the list.
The Source X and Source Y columns contain the Tablet X and Tablet Y values for a tablet calibration or the Image X and Image Y values for an image registration. To change the column, click on the existing option and select the appropriate column from the list.
The World X and World Y columns contain the World X and World Y values for a tablet calibration or the Reference X and Reference Y values for an image registration. To change the column, click on the existing option and select the appropriate column from the list.
Check the box next to the Skip Rows option to not import values from one of the rows in the worksheet. Normally this is used for a header row. It can also be used for a row that contains data that does not apply to this project. When the box is checked, the row listed to the right of the Skip Rows text will not be imported into the dialog. When the box is unchecked, all rows are imported. To change the skipped rows, highlight the existing value and type the new row number.
Click OK to accept the points from the file and return to the Image Registration and Warping dialog or the Create Calibration Points dialog. The points are automatically entered into the calibration points table. Click Cancel to return to the Image Registration and Warping dialog or the Create Calibration Points dialog without the values entered.
See Also