Typically, contour lines have elevation numbers associated with them in one of the ID fields. Technically, you could select each line and type the ID into the Property Manager's Data Attributes section, but this is time consuming when you have many polylines. Instead, you can use the Assign Elevations command.
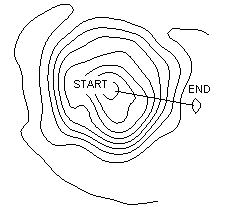
The minimum elevation is at the circle in
the center of the map and the maximum
elevation is at the right-side circle. Begin
the line at the center of the map and
end it just inside the right-side circle.
To automatically assign elevations:
Click the Map | Data | Assign Elevations command.
The cursor changes to  . To assign the elevation data, a line must be drawn from the minimum contour polyline to the maximum contour polyline. The minimum elevation is assigned to the first polyline the line crosses and each successive polyline is assigned an increasing elevation based on the specified contour interval. The minimum contour level is located at the center circle of this map and the maximum contour is located at the circle on the right side of the map. Position the cursor just inside the center circle, hold down the mouse button, and drag the cursor to the circle on the right side of the map to draw the line.
Release the mouse button and the Assign Elevations dialog appears.
Type 5460 for the Starting Elevation.
Type 60 for the Increment Value.
The Assign to Data list contains the fields that can be used for the data. In this case, select Primary ID.
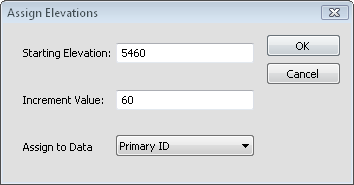
Enter the Starting Elevation and Increment Value to
assign elevations to all the polylines crossing the
line drawn with the Assign Elevations command.
Click OK and the elevations are entered into the primary ID. You can see all the primary IDs in the Data Manager.
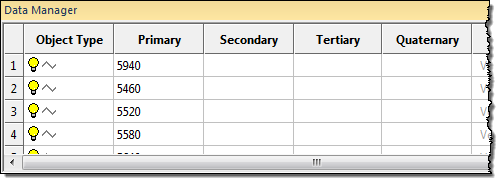
The Z level values are listed for the Primary ID in the Data Manager.
Back to Turning Off the Image Display
Next to Preprocessing Note