The File | Export command creates an LAS file from the selected polyline. The LAS file follows the LAS 2 format, so it is compatible with most programs.
After typing a File name and clicking Save, the LAS Export dialog appears.
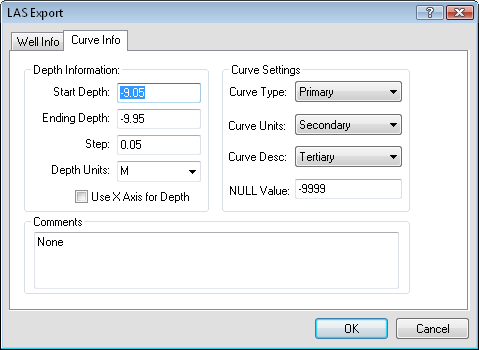
Fill in the depth information and any comments on the Curve Info page.
The Start Depth is the first value being exported to the LAS file. To change the value in the LAS file, highlight the existing value and type the desired value.
The End Depth is the last value being exported to the LAS file. To change the value in the LAS file, highlight the existing value and type the desired value.
The Step is the spacing for the depth values in the exported LAS file. One measurement will be recorded at each Step. To change the Step, highlight the existing value and type a new value.
The Depth Units are the units being exported for the polyline. To change the option, click on the existing depth unit and select the desired value from the list.
The Use X Axis for Depth check box is to determine if the polyline in the plot should be flipped. Check this box if the X Axis (horizontal direction) should be used as the depth axis.
Use the Curve Type list to specify the type of curve being exported. The list includes all available IDs. One ID should contain the curve type, such as GR.
Use the Curve Units list to specify the units of curve being exported. The list includes all available IDs. One ID should contain the curve units, such as ohms.
Use the Curve Desc list to specify any additional descriptions for the curve being exported. The list includes all available IDs. One ID can contain additional information about the curve.
The NULL Value is the value in the log that should be used to indicate that the value is not recorded.
Enter any comments in the Comments section. These are added to the top of the LAS file.
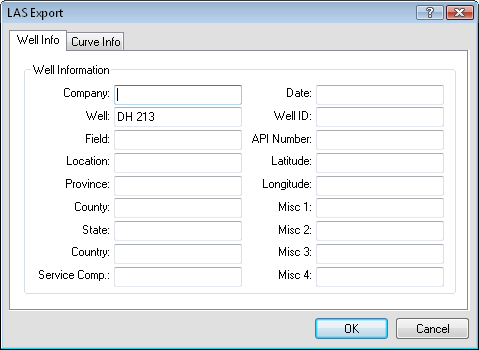
Set the options for the well on the Well Info page.
Enter the company name in the box next to Company. This is an optional entry and does not need to be input.
The Well name is the Hole ID for the selected log. To change the Well, highlight the existing text and type the desired well name. This is an optional entry and does not need to be input.
Enter the field name in the box next to Field. This is an optional entry and does not need to be input.
Enter the location name in the box next to Location. This is an optional entry and does not need to be input.
Enter the province name in the box next to Province. This is an optional entry and does not need to be input.
Enter the county name in the box next to County. This is an optional entry and does not need to be input.
Enter the state name in the box next to State. This is an optional entry and does not need to be input.
Enter the country name in the box next to Country. This is an optional entry and does not need to be input.
Enter the service company name in the box next to Service Comp.. This is an optional entry and does not need to be input.
Enter the date in the box next to Date. This is an optional entry and does not need to be input.
Enter a well identification in the box next to Well ID. This is an optional entry and does not need to be input.
Enter the API number in the box next to API Number. This is an optional entry and does not need to be input.
Enter the latitude value in the box next to Latitude. This is an optional entry and does not need to be input.
Enter the longitude value in the box next to Longitude. This is an optional entry and does not need to be input.
Enter any miscellaneous comments in the boxes next to Misc 1, Misc 2, Misc 3, and Misc 4. These are optional entries and do not need to be input.
Click OK to create the LAS file with the selected options. Click Cancel to not export the file and return to the view window.
See Also