Assign Elevations
Click
the Map | Data | Assign Elevations command
to quickly add incremental elevation values to polyline objects, such
as contour lines. At least three polylines must exist in the project for
the command to be available.
To add elevation values to a set of polylines:
Click the Map
| Data | Assign Elevations command.
The pointer changes to  .
.
Click just before the lowest elevation polyline.
Hold down the left mouse button and drag
a line across the polylines you want to increment.
Release the left mouse button just after
the highest elevation polyline.
The selected polylines are highlighted in
green and the Assign Elevations
dialog opens.
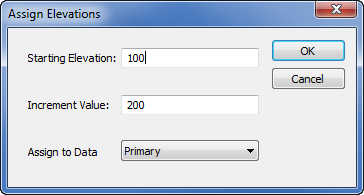
Set the Starting Elevation,
Increment Value, and the
ID to assign the Z value in the Assign
Elevations dialog.
Highlight the existing value in the box next
to the Starting Elevation
option and type the desired first elevation value.
Highlight the existing value in the box next
to the Increment Value option
and type the desired contour level increment. This is the elevation
difference between adjacent contours.
Click on the existing ID in the Assign
to Data option and select the desired ID from the list. The
Z value will be written to this ID. If information already existed
for this ID, the information is overwritten by the Z value.
Click OK.
The incremental contour values are assigned to the contour lines and
populated in the selected data field. You can open the Data
Manager to view the changes in the data fields.

All contour lines that intersect the red line are assigned
an elevation
value based on the
values entered in the Assign Elevations
dialog.
Note that the command does not work on polygons. Polygons must first
be converted to polylines
to use the Assign Elevations command.
See Also
Vectorize image
Edit Attribute Fields
Property Manager
Line Properties