 button to change or modify the colors of an image.
Modify Image Colors
Click the Image | Modify Image Colors command or click the button to change or modify the colors of an image.
Select the appropriate colors and the type of modification
and click Apply to view the changes on the image.
The Current Color column displays the color selected from the image in the plot window. To change the Current Color, move the pointer over the image in the plot window. Move the cursor over the image, and the cursor changes to  . Click on the color you want to select and the Current Color selected is changed. If you make a mistake or click the wrong color, simply click again on the intended color on the image to update the color in the Current Color column.
To zoom into the image, press and hold the SHIFT key on the keyboard and click on the image. To zoom out of the image, press and hold the CTRL key on the keyboard and click on the image. Alternatively, use the mouse scroll wheel to zoom in and out. To move around on the image, click on the scroll bars to move up/down or right/left. Alternatively, press and hold the mouse scroll wheel down and drag the image on the screen.
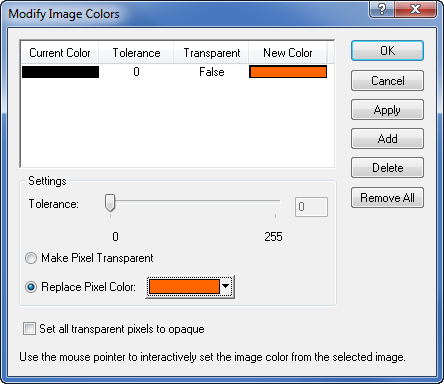
To add a new color to the list, click Add to the right of the color section. To delete a color from the list, click on the color in the dialog and click Delete to the right of the color section. To delete all of the selected colors, click Remove All.
The Tolerance determines the range of colors identified by each color. The value is reported in the Tolerance column. Tolerance defines a similarity in color from one pixel in an image from another pixel in that same image. For instance, the blue rivers might be a darker value than the lighter colored lakes. If you only want the blue rivers to change colors, then you want the tolerance value low so the range of blue does not include the lighter blue lakes. Pixel values can range from 0 to 255. A low color tolerance is very similar to the pixel color selected. A high color tolerance fills the pixels within a broader range. Click and drag the  to the right to broaden the pixel range of color. The tolerance number moves up as the slider moves right. This is useful for color images that have a variety of pixel color ranges and all of the colors in the range should be changed. When the Tolerance value is zero, only the selected color is changed.
The Transparent column is either True or False. When the Transparent option is True, the Make Pixel Transparent option is selected. When the Transparent option is False, the Replace Pixel Color option is selected. When Transparent is set to True, all of the selected colors are removed from the image, as if they were not there. When Transparent is set to False, all of the selected colors are change to another color, as displayed in the New Color column.
The New Color column displays the color that replaces the Current Color. If Replace Pixel Color is selected, click on the color button to the right and select a color from the color palette. Once a new color is selected from the list, it is displayed in the New Color column. When replacing a color in a grayscale image with a true color, Didger converts the selected color to its corresponding gray shade. If the Make Pixel Transparent option is selected, there is an X through the New Color column, indicating that the color is transparent, not replaced.
Check the box next to the Set all transparent pixels to opaque to convert all transparent colors in the image back to the pre-transparent color.
Click Apply to view the color changes on the image in the Didger window. Click OK to apply the color changes to the image and close the dialog. Click Close to close the dialog. Any color changes that have been applied to the image are saved. Click Cancel to undo all changes that have been made in the dialog.
See Also